Throttle Calibration
Please Note
Throttle Calibration is required for all versions of the FlyByWire A32NX.
Introduction
This guide will help you set up your throttles for use with the FlyByWire A32NX.
There are many controllers available to use in Microsoft Flight Simulator. Many have dedicated throttle levers/sliders, and some have sliders which can be used as throttle levers/sliders.
Although configuration and calibration is similar for most controllers, there are subtle differences between different brands and models.
The major differences between different throttle controllers are:
- Number of axis (levers/sliders).
- Having detents or not.
- Having a reverser range on the throttle axis or not.
- Button on the lever/slider to engage reverser or not.
Please read this guide carefully and follow it step-by-step. Do not just skim over and skip steps, as the calibration might then fail.
Collection of Controllers and their Features
| Controller | Reverser | # of axis | Detents |
|---|---|---|---|
| Thrustmaster TCA | On Axis | 2 | 3 |
| Thrustmaster TWCS | Any Button | 1 | 0 |
| Honeycomb Bravo Throttle Quadrant | Reverser Button | 2 | ? |
| Thrustmaster T.16000M FCS (Flight Stick) | Any Button | 1 | 0 |
| Thrustmaster TCA Sidestick Airbus edition | Reverser Button | 1 | 1 (Idle) |
Use this table to identify how to configure and calibrate your controller with the steps described below.
Resetting to Defaults
Before you start with calibration, consider resetting your settings to default values as described here: Resetting To Defaults
Microsoft Flight Simulator Control Options
PLEASE DO NOT SKIP THIS SECTION!
1. Create a Separate Controller Profile in Microsoft Flight Simulator
Before you change anything in the controller profile, make sure to create a dedicated controller profile for the FlyByWire A32NX in Microsoft Flight Simulator so that any changes to the throttle configuration does not impact any other aircraft.
How to Create a New Controller Profile
Microsoft Flight Simulator allows you to create separate profiles for different controllers. To make that change to the DEFAULT profile of your controller and create a copy of it (DUPLICATE).

2. Set Sensitivity to Linear
Set all sensitivity settings to 0 %. This includes Sensitivity + and -, Dead Zone, Neutral, and Extremity Dead Zone. Leave Reactivity at 100 %.
How to Set Sensitivity to Linear
Set your Sensitivity settings exactly like this:

3. Axis Mapping
Check that the axis mappings are correct.
How to Set Axis Mapping
Your controller needs to have an axis which can be used as a throttle lever. This axis needs to be mapped to the throttle input of Microsoft Flight Simulator. Most controllers will be mapped automatically by Microsoft Flight Simulator in the default profile.
If this is not the case, you can find out which controller axis is used by your controller by using the Sensitivity dialog and moving the lever to see which axis is moving.
You can use either of these MSFS inputs:
-
THROTTLE 1 AXIS (0 TO 100 %)andTHROTTLE 2 AXIS (0 TO 100 %)
(for a throttle with two levers)
-
THROTTLE 1 AXISandTHROTTLE 2 AXIS
(for a throttle with two levers)
-
THROTTLE AXIS
(for a throttle with one lever)
Make sure if you move the throttle all the way from the lowest setting to the highest setting that the white bar underneath the mapping line also moves all the way in both directions.
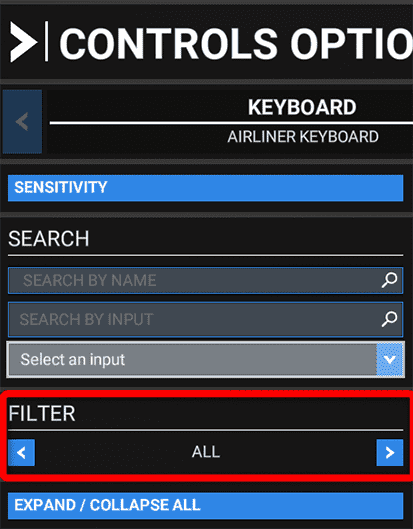
You can't see all options? Try this!
Make sure to set the filter to show all options like this:
Test the Movement of the Throttle in the Cockpit Now!
The throttle in the cockpit should now move in the correct direction. If not, check the Reverse Axis box here:

Don't worry whether the throttle does move all the way or moves too far into reverse now. Only the movement direction is important at this point.
4. Reverser Setup (when not on axis)
If your throttle does not have a range for the reverser, there are two ways to activate and simulate reverser with buttons.
How to Set Up Reverser: Controller With a Separate Button or Key
Microsoft Flight Simulator allows the mapping of a key or button to use the normal throttle axis as the reverser axis. To configure this, choose a key or button on your controller and map it like this:

To activate the reverser, hold the configured button while applying thrust with your thrust lever. Instead of forward thrust, this will apply reverse thrust. The cockpit levers will move backwards into the reverser range.
Alternatively, you can use TOGGLE THROTTLE REVERSE THRUST to use a button or key to activate reverse thrust. While this is active, you can push the throttle forward to increase reverse thrust. To deactivate reverse thrust, you need to press the mapped key/button again.

How to Set Up Reverser: Controllers With Buttons Built Into the Throttle
Some controllers have built in buttons that activate when the throttle is moved into the reverse position. With these controllers, you can't use the above method, as you would have to move the throttles forward to increase reverse thrust. But this would release the reverse button and apply normal forward thrust.
To simulate reverse thrust with these throttle controllers, you can map the reverser button(s) to the THROTTLE 1/2 DECREASE. So, as long as you keep the controller levers in the reverse position, the throttle will be decreased up to full reverse thrust. To stop reverse thrust, you would move the throttle forward (button will be released) and apply a little thrust, so the throttle moves to a non-reverse value again.
Example: Honeycomb Bravo Throttle Quadrant
The mapping required for the Bravo is shown in this screenshot:

The THROTTLE 1/2 DECREASE mapping to Buttons 10, 26 and Buttons 11, 27 simulates the reverser when the Bravo's reverser lever is lifted (buttons 10 and 11) and the thrust lever is pulled back (buttons 26 and 27). This activates the buttons configured in the image above, and in turn decreases throttle power to negative values for the reverser.
If you release the reverser levers (buttons 10 + 11) the mapping to THROTTLE CUT activates and puts the thrust back to idle.
If you use the GA levers you will need to map the reverser to some other button, e.g., on your yoke/side stick, as the reverser buttons (10, 11) will not be there.
5. Test
Do not go on with the guide without successfully testing the following:
- The throttle in the cockpit should now move in the correct direction.
- The throttle in the cockpit should move to TOGA when you set your controller to full thrust.
- The throttle in the cockpit should move to IDLE or FULL REVERSE when you set your controller to the lowest possible setting.
If the tests are successful, please move to the next chapter. Otherwise, go through this chapter again to resolve any issues.
PLEASE DO NOT SKIP THE SECTION ABOVE
A32NX flyPad (EFB) Detent Calibration
1. flyPad Calibration Page
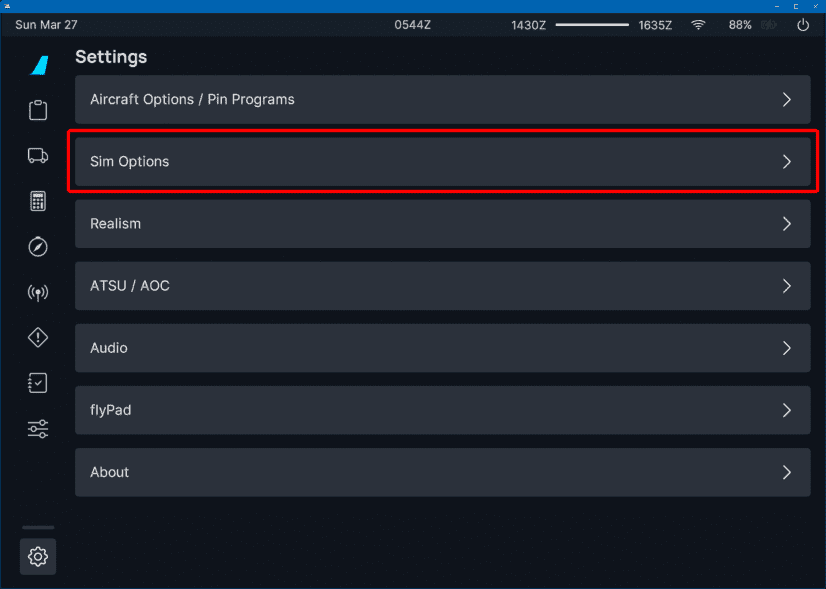
Where Is the Throttle Configuration?
Open the flyPad (maybe pop it out to a separate window next to the throttle with Right Alt+Left Button) and go to Sim Options (Tab) -> Calibrate.

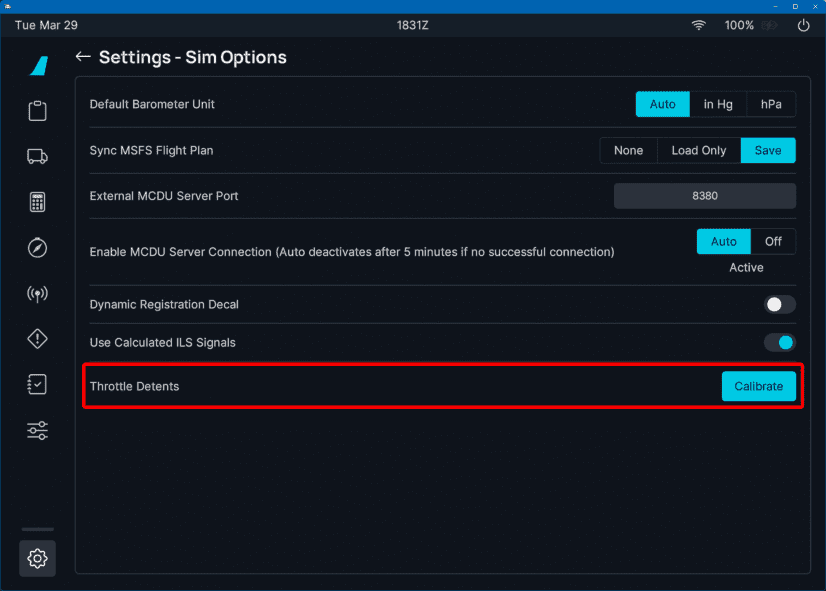 Throttle Calibration Page:

2. Set Up Your Controller Characteristics
Configure the basic characteristics of your controller at the top of the calibration page.
How to Set Up the Controller Basics

Set Reverser on Axis to ON if your throttle has a range for the reverser thrust (lowest setting is full reverse).
Set Reverser on Axis to OFF if your throttle does not have a range for the reverser thrust (lowest setting is idle).
Set Independent Axis to ON if you have two throttle levers. If you only have one throttle lever, set it to OFF.
Examples for Common Hardware:
| Controller | Reverser on Axis | Independent Axis |
|---|---|---|
| Thrustmaster TCA | ON | ON |
| Thrustmaster TWCS | OFF | OFF |
| Honeycomb Bravo Throttle Quadrant | OFF | ON |
| Keyboard / Xbox (buttons) | OFF | OFF |
3. Deadband / Range Setting
Analog controllers always have some imprecision, and it is necessary to define a range of values which should be
treated as a valid range for a detent. This is called a deadband.
Usually, there is no need to change the deadbands for the detents, as the default values are sufficient in most cases!
How to Check and Change the Deadbands

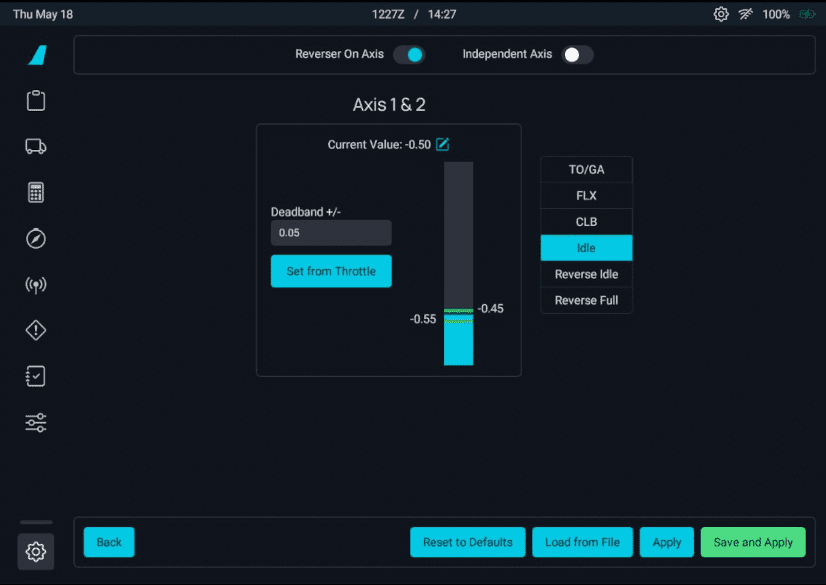
The image above shows the controller in the IDLE position with a
control value of - 0.50.
As some controllers might be at a lower or higher value than - 0.50 and even the same controller might sometimes have slightly different values although in the same position, the deadband of 0.05 ensures that small differences in actual values are treated as within a valid range for the IDLE position. In this case all values from - 0.55 to - 0.45 are valid IDLE positions.
Notice that the blue bar correspondents to the current throttle position and is between two green lines. The green lines mark your deadband range for the detent. As long as the blue bar is between them, the throttle reads this as the corresponding detent. If your throttle is outside these green bars, they become gray as you no longer are in the corresponding detent.
If your controller values vary a lot although in the same position the value might sometimes be outside the deadband range. In this case, carefully increase the deadband value to include the value variations of the controller.
Do not change the deadband if not necessary and also never set a value too large as deadband ranges must not overlap!
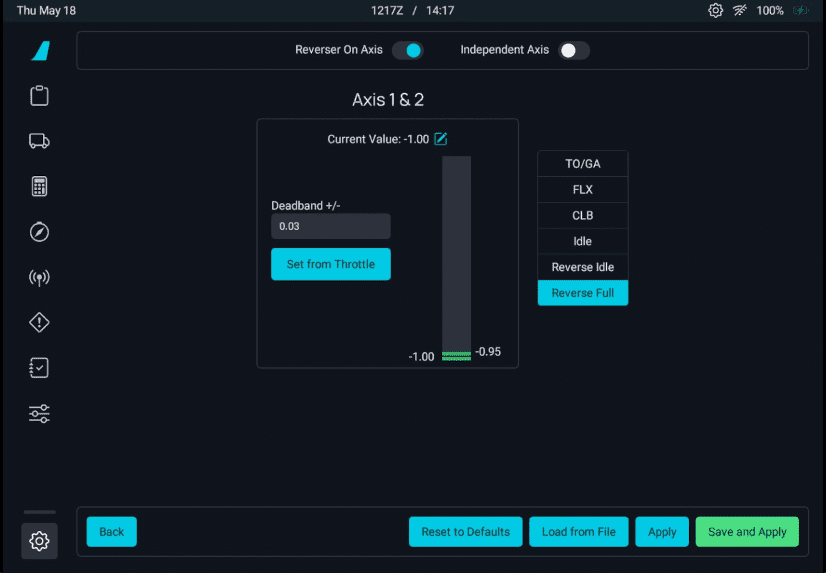
4. Start With Full Reverser (or Idle)
We start the detent calibration with the lowest throttle setting.
How to Calibrate: Controllers With Reverser on Axis
For controllers with Reverser, the lowest setting is Full Reverse.
Pull your controller levers all the way back into the Full Reverse position.
 The "Current Value" should be close to - 1.0.
Press "Set From Throttle" on both sides.
The "Current Value" should be close to - 1.0.
Press "Set From Throttle" on both sides.
How to Calibrate: Controllers Without Reverser on Axis
For controllers without Reverser, the lowest setting is IDLE.
Pull your controller levers all the way back into the IDLE position.
 The "Current Value" should be close to - 1.0.
Press "Set From Throttle" on both sides.
The "Current Value" should be close to - 1.0.
Press "Set From Throttle" on both sides.
5. Go Through All Detents
Go through all detents from the lowest thrust to the highest thrust carefully and repeat the process from Step 4. for each detent.
How to Calibrate All Detents
Set the controller lever to the desired position and click the corresponding button on the calibration page.
Press "Set From Throttle" on both sides for each detent.
- Reverse Full (if you have a reverser on axis)
- Reverse Idle (if you have a reverser on axis)
- Idle
- CLB
- FLX
- TO/GA
6. Save and Apply
Click on "Save & Apply".
Save & Apply

7. Test
How to Test Calibration
Test each setting with a view like this. Make sure the mouse is outside the pop-out window, otherwise the aircraft's throttles won't move.
 Do a short test flight to confirm that all detents work as expected and also that reversers work as expected.
Controller Specifics
Start with the Microsoft Flight Simulator Control Options first!
Start with this section before you go on with the controller specifics.
Thrustmaster TCA Throttle
Thrustmaster TCA Throttle
Full Reverse
-
Make sure that your TCA throttles are all the way back to Full Reverse (pull the Reverse Levers up to do so).

-
Open the flyPad (maybe pop it out to a separate window next to the throttle with Right Alt+Left Button) and go to Settings -> Calibrate.
Throttle Calibration Page:

-
Set
Reverser on Axisto ON (see 1 in image). -
Set
Independent Axisto ON (see 2 in image). -
Click on
Reverse Fullin the middle (3)- Confirm that the value for Axis 1 (4) and Axis 2 is - 1.0 (or very close to).
To get the current throttle values, it might be necessary to move the mouse outside the EFB window if you popped out the window with Right Alt+Left Button
-
Click on
Set From Throttlefor Axis 1 (6) and Axis 2 (7).
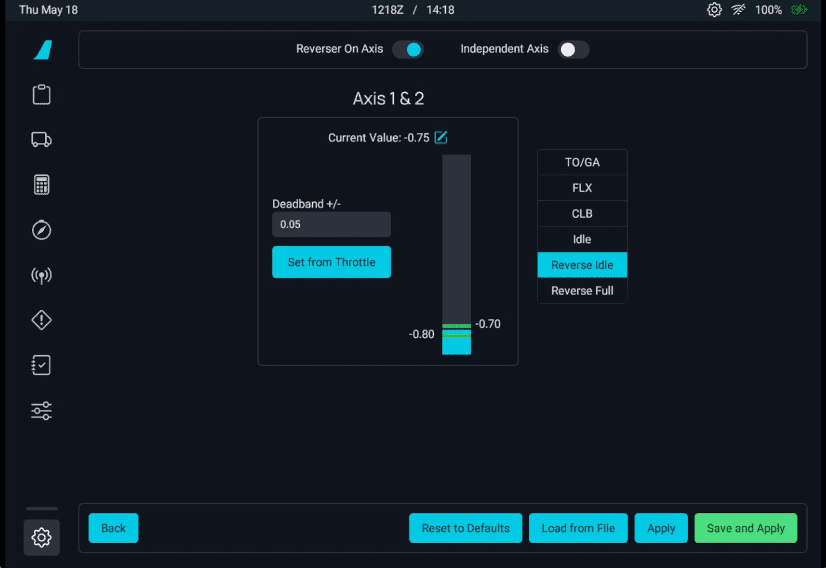
Reverse Idle
-
Move your TCA throttle forward until the Reverse Levers snap back, and then pull the Reverse Levers up again and move the throttle back a bit. There is no detent for Reverse Idle, so just make sure it is not all the way back but well out of the Idle Detent.
To get the current throttle values, it might be necessary to move the mouse outside the EFB window if you popped out the window with Right Alt+Left Button

-
Click on Reverse Idle in the middle (3)
-
Click on Set From Throttle for Axis 1 (6) and Axis 2 (7).

Notice how the blue bar (current throttle position) is between two green lines. These green lines are your deadband range for the detent. As long as the blue bar is between them, the throttle reads this as the corresponding detent (in this case, Reverse Idle). If you move the throttle outside these green bars, they become gray as you now no longer are in the corresponding detent.
You can enlarge the deadband by increasing the value above the "Set From Throttle" button. Currently, this is 0.05 - set it as required, which will move the green lines down/up.
Usually, the default values are sufficient.
Idle
- Move the TCA throttle into the IDLE detent by moving it forward until the Reverse Levers snap back, then pull the throttle levers back against the reverse lock.
- Click on Idle in the middle (3).
-
Click on Set From Throttle for Axis 1 (6) and Axis 2 (7).

CLB
- Move the TCA throttle forward one detent (CLB detent).
- Click on CLB in the middle (3).
-
Click on Set From Throttle for Axis 1 (6) and Axis 2 (7).

FLX/MCT
- Move the TCA throttle forward one detent (FLX/MCT detent).
- Click on FLX in the middle (3).
-
Click on Set From Throttle for Axis 1 (6) and Axis 2 (7).

TOGA
- Move the TCA throttle all the way forward (TO GA).
- Click on TOGA in the middle (3)
-
Click on Set From Throttle for Axis 1 (6) and Axis 2 (7).

-
Click on "SAVE AND APPLY" (8)
-
Test each setting with a view like this. Make sure the mouse is outside the pop-out window, otherwise the aircraft's throttles won't move.
Congratulations! You have successfully calibrated your TCA Throttle!
Thrustmaster TWCS Throttle
Thrustmaster TWCS Throttle
This describes the calibration of a single axis throttle with no Reverser on Axis and also no detents.

Throttle Mapping
")
This throttle does not have reversers on its axis, so we need to map the reverser activation onto a button on the throttle or key on the keyboard (see 2 below). In the example below, we used the button "3" for this.

Hold this button and push the throttle forward to increase reverse thrust.
Calibrating in the FlyByWire flyPad (EFB)
-
Go to the flyPad Throttle Calibration page

-
As this throttle has no reverse and only one real axis, set the
Reverser on Axisto OFF (1) and also theIndependent Axisto OFF (2) -
Move the throttle all the way back to idle.
-
As described above, we go through all detents and set the values accordingly with
Set From Throttle. The easiest way to do that is by having the flyPad in a separate window next to the throttle, as in the screenshot below.
-
For the detents CL, FLX and TO GA you can increase the dead zone to make it easier to move your throttle into the detents.

In this example, we have set the dead zone to 0.25 on either side of the actual setting. For FLX and TO GA, you can use 0.10 or 0.15.
Do not overlap any deadband ranges between detents!
-
Click on "SAVE AND APPLY" (8) and test everything
Congratulations! You have successfully calibrated your throttle!
Honeycomb Bravo Throttle Quadrant
Honeycomb Bravo Throttle Quadrant

The Honeycomb Bravo Throttle Quadrant does not have a real reverser on axis but emulates this by using a button when pulled back into the reverser position.
This makes configuration a bit awkward because Microsoft Flight Simulator is incapable to directly use this setup for a realistic reverser functionality.
To realistically use the reverser, the pilot would lift the reverser lever and the pull the throttle back into the reverser range of the throttle axis.
There is however a way to simulate this with MSFS and the FlyByWire Throttle Calibration as described below.
Throttle Mapping
The mapping required for the Bravo is shown in this screenshot:
You might need to use THROTTLE 1/2 AXIS and not THROTTLE 1/2 AXIS (0 TO 100 %).
Also do make sure to have REVERSE AXIS unchecked!
The THROTTLE 1/2 DECREASE mapping to Buttons 10, 26 and Buttons 11, 27 simulates the reverser when the Bravo's reverser lever is lifted (buttons 10 and 11) and the thrust lever is pulled back (buttons 26 and 27). This activates the buttons configured in the image above, and in turn decreases throttle power to negative values for the reverser.
If you release the reverser levers (buttons 10 + 11) the mapping to THROTTLE CUT activates and put the thrust back to idle.
If you use the GA levers you will need to map the reverser to some other button, e.g., on your yoke/side stick, as the reverser buttons (10, 11) will not be there.
Calibrating in the FlyByWire flyPad (EFB)
Tip: Default Values for Bravo
You can use these default values for the Bravo throttle. See Manual Configuration on how to do this.
You still should verify the configurations as described below, as all hardware units are slightly different.
[throttle_common]
reverse_on_axis = false

[throttle_axis_1]
reverse_low = -1.000000
reverse_high = -0.950000
reverse_idle_low = -0.720000
reverse_idle_high = -0.620000
idle_low = - 1.000000
idle_high = - 0.900000
climb_low = - 0.161230
climb_high = 0.138770
flex_mct_low = 0.840000
flex_mct_high = 0.940000
toga_low = 0.950000
toga_high = 1.000000

[throttle_axis_2]
reverse_low = -1.000000
reverse_high = -0.950000
reverse_idle_low = -0.720000
reverse_idle_high = -0.620000
idle_low = -1.000000
idle_high = -0.900000
climb_low = -0.169348
climb_high = 0.130652
flex_mct_low = 0.820000
flex_mct_high = 0.920000
toga_low = 0.950000
toga_high = 1.000000
-
Go to the flyPad Throttle Calibration page
-
As this throttle has no reverser on the axis, set the
Reverser on Axisto OFF but setIndependent Axisto ON.
-
Move the throttle all the way back to idle.
-
As described above, we go through all detents and set the values accordingly with
Set From Throttle. -
For the detents CL, FLX and TO GA, you can increase the dead zone to make it easier to move your throttle into the detents.
In this example, we have set the dead zone to 0.25 on either side of the actual setting. For FLX and TO GA, you can use 0.10 or 0.15.
-
Click on "SAVE AND APPLY" (8) and test everything
Congratulations! You have successfully calibrated your throttle!
Keyboard
Keyboard
No calibration required for keyboard - read below!
The keyboard does not have any axis which could be used for controlling the throttles. It uses various keys to increase and decrease the throttles, or to set the throttles to predetermined positions.
Please Note the Following
If you have trouble hitting the detents with the keyboard, you might have an old configuration which has detents defined that are smaller than the 0.05 button stroke step size. To fix this, you either:
- Manually remove the old ThrottleConfiguration.ini in our work folder.
- See Work Folder Section for details.
- Fix the problematic detent's deadband size to be larger than 0.05.
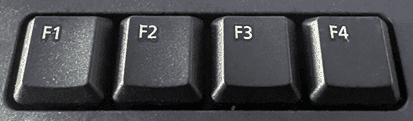
The default Microsoft Flight Simulator mappings is:
- Ctrl+F1: Set throttles to
IDLE - Ctrl+F2:
Decreasethrottle by 1/40th (below IDLE this engages the reverser) - Ctrl+F3:
Increasethrottle by 1/40th - Ctrl+F4: Set throttles to
TO/GA
The A32NX throttle calibration uses values from - 1.0 to + 1.0:
Full Reverseis at - 1.0IDLEdetent is at - 0.5CLBdetent is at 0.0MCT/FLXis at 0.5TO/GAis at + 1.0.
The step size for F2 and F3 is 0.05. This results in 40 steps in total from Full Reverse to TO/GA. The CLB detent is right in the middle at 20 steps.
With the default throttle configuration built into the A32NX, this results in the following number of steps:
Counting from IDLE (- 0.5):
- 10 times Ctrl+F2 (decrease) for
Full Reverse(- 1.0) - 10 times Ctrl+F3 (increase) for
CLBdetent (- 0.0) - 10 times Ctrl+F3 (increase) for
MCT/FLXdetent (0.5) - 10 times Ctrl+F3 (increase) for
TO/GAdetent (1.0)
Congratulations! You can use the keyboard for throttle control!
Keyboard Special Mapping
Keyboard Special Mapping
To make your life a bit easier when using a keyboard for your throttles, you can follow the tips described here.
Create the following key mapping:

Of course, instead of Shift+1 to Shift+4 you can use any key or controller buttons you like.
You can now use the above described method to calibrate your keyboard throttle positions to the correct detents.
This should look similar to this, although the exact number may vary a bit.
-
Press IDLE = Shift+1 and check that the throttle is at IDLE
-
CLB = Shift+2
-
FLX/MCT = Shift+3
-
TOGA = Shift+4
-
REV IDLE = from IDLE position press 3 times ++F2++
-
REV FULL = from IDLE position keep ++F2++ pressed
Congratulations! You can use the keyboard for throttle control!
Xbox Controller
Xbox Controller

No calibration required for the Xbox controller - read below!
The Xbox-Controller (or any other game controller) is very similar to controlling the throttle with the keyboard. It uses buttons to increase and decrease the throttles.
Therefore, read the Keyboard section but instead of F2 or F3 use the buttons mapped to throttle increase and decrease on your controller. See also the Keyboard Special Mapping as this also works for the Xbox buttons.
For the Xbox-Controller the default buttons are:
- A: Increase throttle
- B: Decrease throttle
Of course, you can map different buttons in MSFS. Also, other controllers might have different default buttons for the throttle.

We recommend to also map a button to set the throttles to IDLE during landing. This can be done by mapping the THROTTLE CUT function to a controller button.
Congratulations! You can use your Xbox controller for throttle control!
Troubleshooting
Resetting To Defaults
If you have done a previous calibration or if you have trouble with the calibration, you can reset the calibration to its default values by pressing the reset button.

After clicking the Reset button, you can also click the Apply button, so the default settings are sent to the aircraft.
Detents Overlap
One of the most common issues is overlapping detents. Especially when coming from a different throttle (e.g., without reverser axis).
You can't Save and/or Apply while this error message is shown!

This can easily be fixed by carefully following the steps above, which will remove the error message, which then in turn allows to SAVE & APPLY.
Another solution is to simply delete the current configuration file (as described in the next chapter) and start over your configuration from default values.
Manual Configuration
Expert Advice - use with care!
This configuration is meant for users who are comfortable finding and changing setting-files manually. It is important to create a backup copy of each file you modify before changing anything to be able to revert to the previous state in case things go wrong!
To set up or correct throttle calibration values directly, we follow these steps, which are detailed below.
- Shut down Microsoft Flight Simulator.
- Locate your "work*" folder.
- Locate the "ThrottleConfiguration.ini" file.
- Create a backup copy of the "ThrottleConfiguration.ini" file.
- Delete or edit the "ThrottleConfiguration.ini" file as required!
- Start Microsoft Flight Simulator and test.
Work Folder
Microsoft Flight Simulator allows mods like FlyByWire A32NX to store configuration and other data in a folder called "work": This folder is located in different places for the MS Store version and the Steam version of Microsoft Flight Simulator. The folder's location is described in the next paragraphs.
If you can't find the folders, these folders might be hidden from you by Windows. Follow the directions on "View hidden files and folders in Windows 10" on Microsoft's support site.
Microsoft Store Version
The folder can be found here:
%LOCALAPPDATA%\Packages\Microsoft.FlightSimulator_8wekyb3d8bbwe\LocalState\packages\flybywire-aircraft-a320-neo\work
This is not your community directory
Steam Version
The folder can be found here:
%APPDATA%\Microsoft Flight Simulator\Packages\flybywire-aircraft-a320-neo\work
This is not your community directory
ThrottleConfiguration.ini
The "ThrottleConfiguration.ini" file stores the configuration values from the flyPad Throttle Calibration page.
You can edit or delete this file while Microsoft Flight Simulator is shut down, and it will be loaded when you start the next flight with the FlyByWire A32NX.
To restore the default values, you can just delete this file. It will be regenerated the next time you start a flight with the FlyByWire A32NX and use the flyPad Throttle Configuration page to SAVE & APPLY a configuration.
Warning
The below example file can be used as a starting point for a Thrustmaster TCA Throttle Quadrant, although it is easier to just delete the config file and restart configuration.
Be aware that each throttle is a little different, and you MUST verify that these values work for your hardware!
Example "ThrottleConfiguration.ini" file based on the default values:
[throttle_common]
reverse_on_axis = true

[throttle_axis_1]
reverse_low = -1.00
reverse_high = -0.95
reverse_idle_low = -0.72
reverse_idle_high = -0.62
idle_low = -0.50
idle_high = -0.40
climb_low = -0.03
climb_high = -0.07
flex_mct_low = 0.42
flex_mct_high = 0.52
toga_low = 0.95
toga_high = 1.00

[throttle_axis_2]
reverse_low = -1.00
reverse_high = -0.95
reverse_idle_low = -0.72
reverse_idle_high = -0.62
idle_low = -0.50
idle_high = -0.40
climb_low = -0.03
climb_high = -0.07
flex_mct_low = 0.42
flex_mct_high = 0.52
toga_low = 0.95
toga_high = 1.00