Recommended Settings
This page aims to list a few recommended settings for the Microsoft Flight Simulator, Windows and the A32NX itself before and while using the FlyByWire A32NX.
If you are new to the FlyByWire A32NX, please also make sure to read the A32NX Beginner Guide, especially Preflight.
Microsoft Flight Simulator Settings
Use DX11
Use of DX11 is recommended for best performance due to an issue with some glass cockpit technologies in the DX12 version of the simulator. This is not an FBW issue, and we cannot address it for now - please keep in mind DX12 is officially a "beta feature" and thus should not be used unless you know what you are doing.

Graphics Settings
Turn off the Lens Correction setting in the Graphics settings page.
If you do not deactivate it, it will be harder to click and move switches, knobs, and buttons in the cockpit.
Set the Glass Cockpit Refresh Rate to Medium or Low to avoid unnecessary display calculations which might cause fps loss.

Deactivate MSFS Assistance Features
A warning will be displayed if you have certain AI assistance features turned on. Please ensure you have disabled them.
Having any AI features or assistance features switched on created some stability issues with our custom systems:
- A/THR failing to arm or activate.
- Engines turning off in-flight or after takeoff.
- Constant right or left rudder.
- Inability to taxi.
Verify Settings
You can verify the assistance and AI features are switched off by checking the following settings.


Legacy Cockpit Interaction System
We recommend the legacy (previous) method of the Cockpit Interaction System (Menu > General Options > Accessibility).

Failure And Damage Detection
We recommend disabling the Failure and Damage detection (Menu > Assistence Options > Failure and Damage) to avoid frustration. This feature does not work reliably and our systems are not compatible with the simulator's crash detection. You may be returned to the menu or have to restart your flight due to some the following reasons:
- Weather rapidly updating causing aircraft stress
- Aircraft stress due to high angle of attack or severe maneuvers (even occur during normal takeoffs and landings)
- Rough terrain data on runways or taxiways

In most situations these factors are typically out of your control unless pilot error is involved (where in a "simulation" environment you can recover your flight and continue your journey).
Controllers
Sensitivity settings are highly hardware-dependent and can be different for each controller. The below recommendations are therefore initial starting points, and it might be necessary to adapt these for your controller and your preference.
Sidestick / Joystick
We highly recommend using a joystick or flight stick when flying any aircraft in a simulator. Keyboard or controller buttons simply do not have the range and sensitivity required for successfully controlling an aircraft.
For the flight stick pitch control (up/backward and down/forward) we recommend using a sensitivity setting of - 30 % to better simulate the increased force you need to push or pull the real sidestick in the aircraft. Please see the screenshot below for an example:

For roll (left or right) use what you think is best for you. The above-mentioned - 30 % is a good starting point.
Rudder/Tiller
For the rudder, which by default also controls the nosewheel in MSFS, we recommend a bit of sensitivity, although linear should also work fine.
On the Development version, if you have an extra axis on your controllers (e.g., twisting joystick while rudder is on pedals) you can separate the nosewheel steering via tiller from the rudder inputs. See Nosewheel Tiller Separation.
Racing Pedals Compatibility
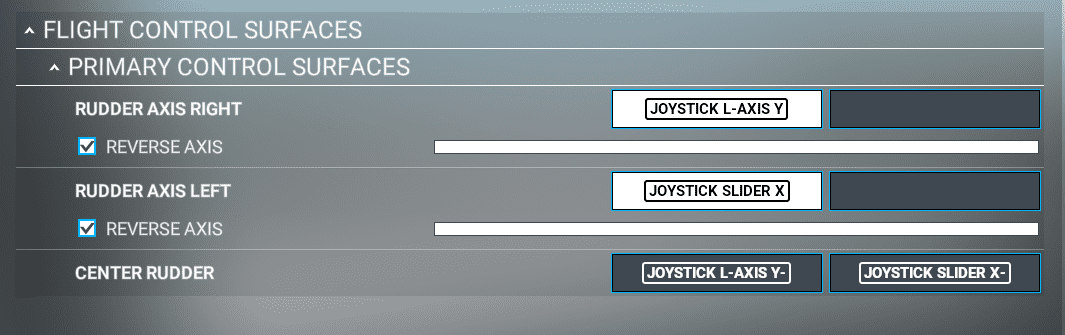
The following configuration can be used with the A32NX if you use racing pedals. Please note that this may not work for all variations of racing pedals, but can serve as a starting point for your settings.
Check and map the following settings:
- Accelerator Pedal ->
RUDDER AXIS RIGHT(Reverse Axis with checkmark) - Clutch Pedal ->
RUDDER AXIS LEFT(Reverse Axis with checkmark) - Accelerator Pedal + Clutch Pedal ->
CENTER RUDDER(This will center the rudder if it remains deflected)
Sample configuration:
Thanks to SteveCollins100 for the configuration tip.
Throttle
The throttle should have linear sensitivity.
See Throttle Calibration Guide.
Keyboard Mapping for Pause Function
Make sure that the Pause function is only mapped to the Esc key and not to any other key as otherwise this mapped
key will trigger Pause in input fields of the EFB or the MCDU when using the keyboard input mode.
Windows Settings
UTF-8 Support
Some users experience problems with various systems in the A32NX. These are caused by an issue within MSFS which requires to use the UTF-8 Region setting on Windows.
- Open Windows Control Panel -> Region.
- Go to the Administrative tab and click Change system locale
- Make sure the check mark next to Beta: Use UTF-8 for worldwide language support is selected.
- Click OK and
restart your computer.

Performance Settings
See Performance Tips
Important A32NX Settings
Installation With FBW Installer
Always use the FlyByWire Installer to install and update the A32NX add-on.
See our Installation Guide.
Throttle
Our Custom Autopilot implementation requires that the throttle is calibrated to be able to correctly recognize the detents the A320 autoflight system relies on.
See Throttle Calibration Guide
Error Reporting
While using our aircraft, you can help us to identify errors by turning on Error Reporting. This is completely optional and anonymous.
With Error Reporting enabled, any severe error in any display of the aircraft (e.g., flyPad, MCDU, PFD, ND, etc.) will create a log entry with our issue tracking system. This will help our development team to see these issues and get some important details to hopefully identify what caused the error.
This will speed up finding and fixing both issues and bugs significantly.
You can decide to activate or deactivate this at any time in the flyPad EFB.
The first time you start the aircraft after this feature has been included and also every time you enable Error Reporting, you will see a confirmation dialog where you need to click on Yes.

flyPad EFB Settings for Error Reporting:
