Development Environment
Required Software, Tools, and libraries
Git and GitHub
To access our source code, a GitHub account is required.
Also, some git client is necessary to interact with the GitHub repository.
Either use a standalone git client (terminal or UI based) or one integrated into your editor.
Make sure you are familiar with the basics of working with git/GitHub. The GitHub Quickstart documentation is a great help.
Docker
FlyByWire provides a preconfigured docker container that has all necessary tools included and preconfigured to compile the aircraft.
To use this, you need to download and install Docker here.
Use either WSL2 or HyperV backend work, but the latter is faster.
Editor or IDE
Most of our team works with either Visual Studio Code or IntelliJ IDEA-based IDEs for development. Obviously, your choice is yours as long as the resulting code conforms to our standards.
For Visual Studio Code, we recommend installing the following extensions: vscode eslint extension
It's recommended to set gitbash as your default shell in vscode
Getting the source code
To work on the A32NX project, you need to create a fork (GitHub fork) of the aircraft repository.
Clone this fork to your local environment. You can use the command line git or a UI-based git to do this. On the command line, go to your projects folder and clone it into that folder.
git clone https://github.com/flybywiresim/aircraft.git
cd aircraft
git submodule update --init
.\scripts\dev-env\run.cmd ./scripts/setup.sh
You now have a copy of the aircraft repository on your local machine to review and change the source code.
The setup.sh is configuring the build process and is sometimes necessary when you changed branches which for example use a different Nodes configuration.
Compiling the source
To compile the source code into a package you can install into the Microsoft Flight Simulator Community folder, we have prepared a few scripts you need to run. These use the Docker container mentioned above to compile the aircraft add-on.
cd aircraft
.\scripts\dev-env\run.cmd ./scripts/build.sh
If you are using WSL, ensure that the Vmmem process is not memory-limited. At least 10GB of memory is the recommended
setting. This can be configured in C:\
The build.sh is actually using the docker container to compile and build the add-on(a) into the folder
fbw-a32nx/out/flybywire-aircraft-a320-neo or fbw-a380x/out/flybywire-aircraft-a380 respectively.
Compiling on Linux (incl. WSL)
You should use run.sh instead of run.cmd if you are on Linux/WSL.
If you are using WSL, ensure that the Vmmem process is not memory limited. At least 10 GB of memory is the
recommended setting. This can be configured in C:\
Create working branches
We recommend when making changes on your fork, you create a new branch, titled with the change you're looking to make or something similar.
After a successful build, it is possible to copy the fbw-a32nx/out/flybywire-aircraft-a320-neo or
fbw-a380x/out/flybywire-aircraft-a380 folders into your Community folder and use the compiled A32NX in your simulator.
See the next chapter for a more convenient way to update the add-on after a compilation.
Important step!
Make sure you remove any existing copy of the aircraft from your community folder before doing this.
Linking Dev folder to Community folder
To avoid having to copy the flybywire-aircraft-a320-neo/fbw-a380x/out/flybywire-aircraft-a380 folders after every
compile, it is possible to use a so-called symlink from your Community folder to your compiled
flybywire-aircraft-a320-neo/fbw-a380x/out/flybywire-aircraft-a380 folder.
To create your symlink, open your command terminal and run the below command, substituting the correct file paths with
your community folder, and the flybywire-aircraft-a320/fbw-a380x/out/flybywire-aircraft-a380 folder from your new
project.
Important step!
Make sure you remove any existing copy of the aircraft from your community folder before doing this.
mklink /J [MSFS Community folder\flybywire-aircraft-a320-neo] [Project folder path\fbw-a32nx\out\flybywire-aircraft-a320-neo]
Example:
mklink /J C:\Users\USERNAME\AppData\Local\Packages\Microsoft.FlightSimulator_8wekyb3d8bbwe\Community\flybywire-aircraft-a320-neo C:\Users\USERNAME\IdeaProjects\aircraft\fbw-a32nx\out\flybywire-aircraft-a320-neo
If this works, you'll receive the response:
Junction created for \[Community folder] \[Project Folder] from the terminal.
Now you've compiled and symlinked your GitHub fork to your community folder, you should be able to load into the aircraft as normal.
Open MSFS and check everything is working with your compiled branch before progressing.
Hello World Example
Before changing anything, we recommend creating a new branch from the master branch:
git checkout -b test-branch master
Open this file in the editor/IDE:
fbw-a32nx/src/systems/instruments/src/MsfsAvionicsCommon/displayUnit.tsx
Go to line 181 and add the following after that line:
    <text
        class="SelfTestText"
        x="50%"
        y="62%"
    >
        HELLO FLYBYWIRE A32NX!
    </text>
After you save, it should look like this:
    <svg style="display:none" ref={this.selfTestRef} class="SelfTest" viewBox="0 0 600 600">
        <rect class="SelfTestBackground" x="0" y="0" width="100%" height="100%" />
        <text
            class="SelfTestText"
            x="50%"
            y="50%"
        >
            SELF TEST IN PROGRESS
        </text>
        <text
            class="SelfTestText"
            x="50%"
            y="56%"
        >
            (MAX 40 SECONDS)
        </text>
        <text
            class="SelfTestText"
            x="50%"
            y="62%"
        >
            HELLO FLYBYWIRE A32NX!
        </text>
    </svg>
Now recompile your branch:
.\scripts\dev-env\run.cmd ./scripts/build.sh --no-cache
The optional --no-cache option makes sure everything is recompiled.
After the successful compile, start the sim and load the FlyByWire A32NX cold & dark at a gate.
When turning on power to the aircraft, the screens will do a self test. See if you can spot your code change there.
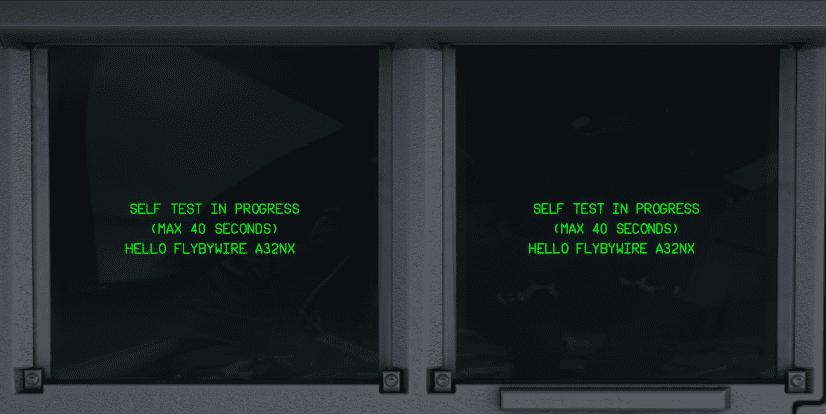
Congratulations! You have successfully made a code change and deployed the new add-on to the simulator.
Development Workflow
The above is obviously not an efficient workflow as you have to restart the simulator after every code change. There are several ways to avoid this and hot reload the code into the simulator while it is running. But this is out of scope for this guide as it only serves to test the basic development environment.